Handmade felt Christmas ornaments turn holiday crafting into a calm, joyful ritual. You can start today with simple tools and affordable materials. The result is durable décor that looks charming on any tree. Keep reading to learn the complete process, from design to care.
Moreover, this project welcomes beginners and rewards experienced makers with elegant details. Therefore, you can turn scraps into keepsakes that last for years. In addition, the method scales well for gift sets and family workshops. As a result, your tree gains a cohesive look without expensive ornaments.
Why Handmade Felt Christmas Ornaments Win
Firstly, felt does not fray, so cuts stay crisp and clean. Secondly, the fabric is light, which protects branches and keeps shapes upright. However, it still feels substantial when you add a neat edge stitch. Moreover, the color range is huge, letting you match any palette. Consequently, you can design classic or modern sets with equal ease. On the other hand, plastic baubles scratch and fade over time. Therefore, handmade pieces become the more sustainable choice.
Tools and Materials
Gather your supplies before you cut. For example, choose wool‑blend felt for the best stitch definition. It also resists pilling and holds its shape.
-
Wool‑blend felt sheets (1–2 mm)
-
Embroidery floss (matching and contrasting)
-
Hand needles and a thimble
-
Pins or clips
-
Small, sharp fabric scissors
-
Craft knife and cutting mat (for tiny cutouts)
-
Fabric pen or chalk
-
Cardstock for templates
-
Polyester fiberfill
-
Narrow ribbon or twine
-
Optional: beads, sequins, tiny buttons, bell charms
You can buy high‑quality wool‑blend felt sheets at Etsy. In addition, keep a thimble and a small ruler nearby for accuracy. Similarly, a sharp craft knife helps with tiny windows and stars. Therefore, set up a bright workspace with a tray for small parts.
Handmade Felt Christmas Ornaments: Step‑by‑Step
Follow this method to make any shape, from stars to gingerbread.
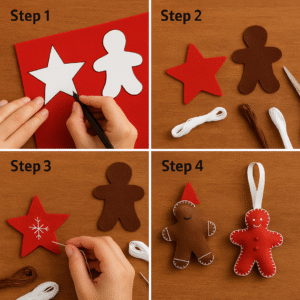
Step 1: Design and trace
Firstly, pick two to three colors and a simple outline. On the other hand, complex silhouettes slow you down and invite fraying on paper edges. In addition, draw a matching back panel for a neat finish. Consequently, both sides look tidy when the ornament spins.
Step 2: Cut clean shapes
Secondly, cut along the line using small, sharp scissors. However, avoid long scissor strokes that create jagged curves. For example, switch to a craft knife for tiny interior cuts. Moreover, store offcuts for mini stars and berries.
Step 3: Edge stitch
Similarly, blanket stitch seals the edges and adds a classic frame. Therefore, start at the top, leaving a gap for stuffing. As a result, the seam stays aligned and strong. However, keep stitches even; wobbly spacing is visible on felt.
Step 4: Add details
Moreover, small French knots add sparkle without bulk. For example, sew sequins onto a star tip for a subtle shine. On the other hand, glue can stiffen felt and leave marks. In addition, backstitch tiny smiles on gingerbread figures. Consequently, your motifs read well from across the room.
Step 5: Stuff and close
Similarly, loosely fill the shape; do not overpack. Therefore, the edges stay flat and the silhouette remains crisp. As a result, light catches the contours without distorting the design. Finally, close the gap with matching stitches.
Step 6: Add a hanging loop
Firstly, cut a 12 cm ribbon or twine. Secondly, slide it between layers before your last stitches. Moreover, anchor it with two extra passes for strength. However, a simple thread loop suits minimalist designs. Therefore, choose the loop that fits your style.
Patterns You Can Make Today
Handmade felt Christmas ornaments work with many themes. On the other hand, repeating shapes in one color looks refined. Similarly, alternating matte and metallic floss adds depth.
Classic Star
For example, cut two stars, embroider a center snowflake, and stitch. As a result, the star stays flat yet dimensional.
Gingerbread Person
Firstly, use tan felt, white backstitch, and tiny red buttons. However, skip real candy; it attracts pests in storage.
Festive Bauble
Layer a small circle on a larger one with a stripe. Consequently, contrast stitching becomes the main graphic element. Finally, add a small felt cap and loop at the top.
Mini Wreath
Punch a hole in the center and whipstitch the ring. In addition, stitch tiny berries with red knots. For example, add a small bow at the top.
Scandinavian Heart
On the other hand, try two colors and weave strips for a basket look. Similarly, keep edges rounded to avoid snagging.
Cost, Sizing, and Time Estimates
Work in batches for speed. Standard ornaments measure 7–10 cm wide. Cut several at once to keep sizes uniform. As a result, a starter set of five ornaments often costs under $15. Consequently, a dozen gifts remain affordable for classrooms or clubs.
A single ornament takes 20–40 minutes, depending on detail. Complex embroidery adds time but raises perceived value. Plan a playlist and a warm drink to keep momentum.
Smart Layout and Cutting Tips
Trace nested shapes to reduce waste. Keep small shapes inside large outlines on your pattern sheet. Label each template with its stitch type and color.
Mark stitch guides lightly with a fabric pen. Remove marks as you go. Cut thread lengths no longer than your forearm to prevent tangling. Arrange pieces on a tray in the order you will stitch them.
Embroidery Stitches That Elevate the Look
Use blanket stitch for edges and backstitch for lines. Add French knots as berries or snow. Try chain stitch for garlands and lazy daisy for petals. Mix matte cotton floss with metallic filament for sparkle. Test stitches on a scrap before you sew the real piece.
Safety, Sustainability, and Storage
Choose wool‑blend felt for safer, slower burning behavior than pure acrylic. Keep needles and sequins away from small children. Store finished ornaments in acid‑free tissue in a sealed box. Label each layer by theme or recipient. Avoid heat and direct sunlight to preserve color.
If you prefer eco fibers, look for recycled polyester fill. Swap plastic beads for wood or felt circles. Use thread offcuts to stuff tiny shapes. Repurpose ribbon from gift wrap for loops.
Packaging and Gifting Ideas
Mount pairs on kraft cards with two tiny slits for loops. Add the year on the back with a fabric pen. Tie sets of three with baker’s twine. Include a short care note and a tag with the ornament’s name.
Offer a family activity kit as a gift. Pre‑cut shapes, pre‑thread needles, and add a photo card with steps. Include two spare needles and extra floss for mistakes. A kit invites creativity and creates memories.
Where to Learn More
Want a printable checklist and pattern sheet? Add it to your reading list and bookmark it for later. For a printable checklist that pairs with this tutorial, visit Category Christmas.
Conclusion
You now have a repeatable method for confident holiday making. Cut clean shapes, stitch steady edges, and add crisp details. Build a color palette and follow the steps above. Your tree and gift list will thank you.
As a result, you can produce a cohesive set in one weekend and enjoy it for years. Therefore, gather your supplies, pick a pattern, and start stitching today.
FAQ
How long do handmade felt Christmas ornaments last?
With gentle handling and dry storage, they can look new for many seasons.
What thickness of felt should I buy for handmade felt Christmas ornaments?
Use 1–2 mm wool‑blend felt for crisp cuts and easy stitching.
Can I wash felt ornaments if they get dusty?
Spot clean with a barely damp cloth. Air dry flat away from heat.
Need premium felt and embroidery floss? Browse curated options at Etsy.
Written by Sara Martinez | Party Decorations Using Recycled Crafts