
A DIY paper Christmas tree is one of the simplest and most affordable ways to bring festive charm into your home. Using only paper, scissors, and glue, you can create unique decorations that fit perfectly on desks, tables, or even as gifts. This article provides a step-by-step guide to making mini Christmas trees with paper, along with creative variations.
Why Make a DIY Paper Christmas Tree?
Handmade crafts add a personal touch to holiday decor. Moreover, a DIY paper Christmas tree is eco-friendly, cost-effective, and a fun activity for both children and adults. Consequently, it allows families to create memories together while saving money on decorations.
Materials Needed
- Colored paper (green, red, gold, or patterned)
- Scissors
- Glue stick or craft glue
- Small beads, sequins, or glitter for decoration
- A cardboard base or cone (optional)
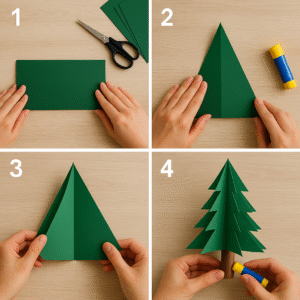
Step-by-Step: DIY Paper Christmas Tree
Step 1: Cut Paper Strips or Shapes
Firstly, decide if you want to make your tree with strips, folded triangles, or circles. After that, cut your paper accordingly.
Step 2: Create the Tree Base
Roll a piece of cardboard into a cone shape and glue the edge. As a result, you’ll have a solid base to attach your decorations.
Step 3: Attach the Paper Layers
Glue paper strips, folded shapes, or circles starting from the bottom of the cone. Similarly, overlap them slightly to create volume.
Step 4: Decorate the Tree
Add glitter, beads, or small stars. In addition, you can place a larger star at the top for a classic look.
Step 5: Display Your DIY Tree
Finally, place your finished paper Christmas tree on a table, shelf, or gift box. Consequently, it becomes an instant festive highlight.
Variations of DIY Paper Christmas Trees
Accordion Fold Tree
Fold strips of paper back and forth like an accordion. Then, glue them around the base for a textured look.
Layered Circle Tree
Cut circles in different sizes and glue them on top of one another, forming a layered tree. Moreover, this variation works well with patterned paper.
Origami Paper Christmas Tree
For a more detailed craft, fold paper into origami tree shapes. As a result, the design looks elegant and precise.
Tips for Crafting Success
- Use thicker paper for sturdier trees.
- Mix different paper colors for a festive effect.
- If making with children, use safety scissors.
- Additionally, prepare multiple trees to decorate several corners of your home.
Colored paper and decorative items are available at craft stores, supermarkets, or online. For example, affordable supplies can be found on Amazon. In addition, dollar stores usually carry seasonal craft items.
Benefits of a DIY Paper Christmas Tree
- Affordable holiday craft
- Eco-friendly decoration
- Fun family activity
- Customizable with endless variations
Conclusion
A DIY paper Christmas tree is an easy and joyful project that adds festive charm to your holiday season. With a few materials and a little creativity, you can design paper trees that fit any style. Finally, remember that the best decorations are the ones you make with love.
See our tutorial on DIY Christmas crafts here.
FAQ
How do I make a sturdy DIY paper Christmas tree?
Use thick paper or cardboard as the base. Consequently, your tree will hold up longer.
Can children make DIY paper Christmas trees?
Yes, children can participate safely with scissors and glue. Moreover, decorating is especially fun for them.
What size should a paper Christmas tree be?
You can make mini trees for tables or larger ones for displays. In addition, the size depends on your available space.
Written by Sara Martinez | Party Decorations Using Recycled Crafts